I'm going to save you a conversation I've had way too many times with clients: "We're investing in SEO and content, but we don't know how many sales it generates." The reason is almost always the same — they haven't set up conversions in Google Analytics 4. Zero. Nothing. Completely flying blind.
And look, I get why it happens. Setting up conversions in GTM sounds intimidating. The dataLayer, triggers, variables, events… it's easy to get lost. But after configuring this for dozens of clients over the past 18 years, I've reached a conclusion: 90% of websites need exactly the same setup. So I've packaged it into 2 ready-to-import JSON templates that will save you hours.
One for service websites (forms, phone, WhatsApp, email) and one for WooCommerce stores (the full eCommerce funnel). Download, import, swap your GA4 ID, and you're done.
And at the end, I'll show you something I'm particularly excited about: how to use LLMFY AI Traffic Analytics to see those conversions broken down by traffic source — including how many come from ChatGPT, Perplexity, Gemini, and other AI search engines.
What you'll have set up by the end
When you finish this guide, you'll have:
- Form submission tracking (Contact Form 7, WPForms, Gravity Forms, etc.)
- Phone call tracking (clicks on tel: links)
- WhatsApp tracking via JoinChat (the most widely used plugin)
- Email click tracking (mailto: links)
- Full eCommerce tracking for WooCommerce (view_item, add_to_cart, purchase, and the entire funnel)
- All events marked as conversions in GA4
- Conversion visibility by channel in LLMFY AI Traffic Analytics
Before you start: what you need ready
Here's the minimum you need before touching anything:
- A Google Tag Manager account — Create one free at tagmanager.google.com
- A Google Analytics 4 property — With your Measurement ID (G-XXXXXXXXXX)
- GTM installed on WordPress — I always recommend the GTM4WP plugin (free and the industry standard)
- Your GA4 Measurement ID — Found in GA4 → Admin → Data Streams → Your web stream
If you don't have GTM on WordPress yet, install GTM4WP, enter your GTM Container ID (GTM-XXXXXXX) in Settings → Google Tag Manager, and enable the container code.
Important if you're in the EU: In your GTM container, go to Admin → Container Settings and enable "Enable Consent Overview". Without this, Consent Mode v2 won't work properly and you may run into GDPR issues. It's how GTM communicates with your CMP (Cookiebot, Cookie Script, Complianz, or whichever you use).
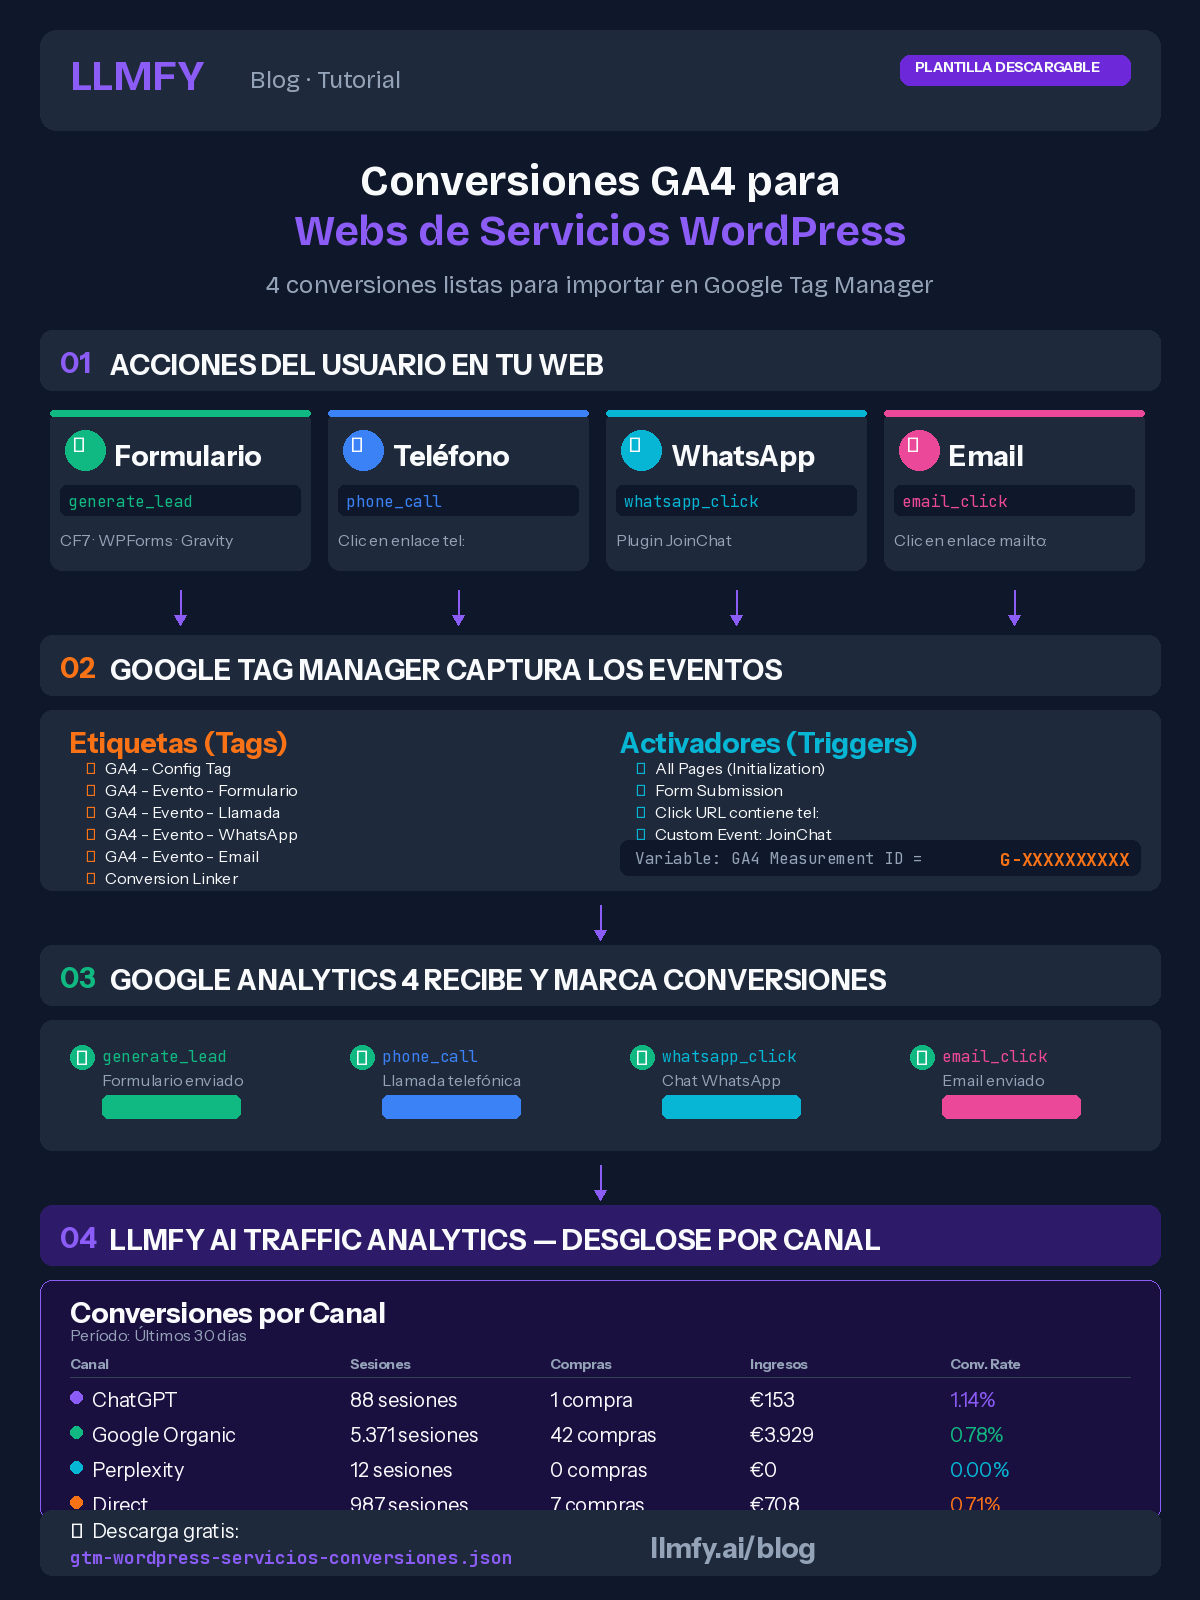
Part 1: Conversions for Service Websites
This template is for law firms, clinics, agencies, consultancies, real estate and generally any website that generates leads. If your business depends on people contacting you via form, phone, WhatsApp, or email, this is for you.
What's included in the template
| Tag | GA4 Event | Trigger |
|---|---|---|
| GA4 - Config Tag | page_view (automatic) | All Pages |
| GA4 - Event - Form | generate_lead | Form Submission |
| GA4 - Event - Phone Call | phone_call | Click on tel: link |
| GA4 - Event - WhatsApp (JoinChat) | whatsapp_click | JoinChat dataLayer event |
| GA4 - Event - Email (mailto) | email_click | Click on mailto: link |
| Conversion Linker | — | All Pages |
Step 1: Download the JSON template
📥 Download Services Template (JSON)
Step 2: Change your GA4 ID (after importing)
The template uses a constant variable called GA4 Measurement ID that feeds all tags. You don't need to touch the JSON file manually — everything gets changed from within GTM.
After importing (step 3):
- Go to Variables in GTM
- Open "GA4 Measurement ID"
- Change
G-XXXXXXXXXXto your real ID (e.g.G-A1B2C3D4E5) - Save
All tags update automatically because they reference this variable. I love this approach because if you ever need to switch GA4 properties, you only change one thing.
Step 3: Import into Google Tag Manager
- Open your container at tagmanager.google.com
- Go to Admin → Import Container
- Select the JSON file
- Choose "New Workspace" (so you don't mix with existing config)
- Select "Merge" as import method
- Choose "Rename conflicting tags, triggers and variables"
- Review the summary — you should see only "New" items
- Confirm
Step 4: Verify with Preview
This is non-negotiable. Never, ever publish GTM changes without verifying first. I've seen clients lose weeks of data by publishing untested changes.
- Click "Preview" in GTM
- Tag Assistant will open with your site
- Check that "GA4 - Config Tag" fires on page load
- Submit a form → verify "GA4 - Event - Form" fires
- Click a phone link → verify "GA4 - Event - Phone Call" fires
- Click the WhatsApp button (JoinChat) → verify "GA4 - Event - WhatsApp" fires
- Click an email link → verify "GA4 - Event - Email" fires
Step 5: Publish
If everything works in preview, click "Submit" → "Publish" and give it a descriptive name like "Service conversions setup v1".
Step 6: Mark as conversions in GA4
This is where a lot of people stop halfway. Importing the GTM template sends events to GA4, but GA4 doesn't treat them as conversions automatically. You have to flip the switch yourself:
- Go to GA4 → Admin → Events
- Wait for events to appear (can take up to 24h, be patient)
- Find:
generate_lead,phone_call,whatsapp_click,email_click - Toggle "Mark as key event" next to each one
Don't want to wait 24 hours? Quick alternative: go to Admin → Key events → New key event and create each event manually. GA4 will recognize it as soon as the first data arrives.
Part 2: GA4 Enhanced eCommerce for WooCommerce
If you run a WooCommerce store, this template covers the full funnel: from a user viewing a product to completing a purchase. Ten events, all automated.
Pre-setup: the GTM4WP plugin (required)
Before touching Google Tag Manager, you need your WordPress to push eCommerce data to the dataLayer. Without these steps, the template won't work because GTM won't receive any events from your store. I've seen people import the template, publish it, and get frustrated because nothing happens — it's always because they skipped this step.
Everything is done in WordPress → Settings → Google Tag Manager (the GTM4WP plugin panel):
Step A — General tab:
- Enter your GTM Container ID (GTM-XXXXXXX)
- Make sure "Container code ON/OFF" is set to ON
- Save changes
Step B — Integration tab → WooCommerce:
- Click the "Integration" tab
- Click the "WooCommerce" sub-tab
- You'll see a message confirming WooCommerce is detected
- Check "Track e-commerce"
- Save changes
This checkbox does the heavy lifting. Without it, when a user adds to cart or completes a purchase, no dataLayer event gets generated and GTM has nothing to capture. With it enabled, GTM4WP automatically inserts all of Google's standard eCommerce events (view_item, add_to_cart, begin_checkout, purchase, etc.) with full product data using Google's recommended event names.
Source: GTM4WP — Official GA4 eCommerce setup documentation
What's included in the template
| GA4 Event | Fires when... |
|---|---|
| view_item_list | User views a product list (category, search) |
| view_item | User views a product page |
| select_item | User clicks a product from a list |
| add_to_cart | User adds a product to cart |
| remove_from_cart | User removes a product from cart |
| view_cart | User views the cart |
| begin_checkout | User starts checkout |
| add_shipping_info | User adds shipping info |
| add_payment_info | User adds payment method |
| purchase | Purchase completed |
The elegant thing about this template is that all events are captured with a single tag using the dynamic event name {{Event}} and eCommerce data from the dataLayer. No need to create ten separate tags.
Step 1: Download the JSON template
📥 Download eCommerce WooCommerce Template (JSON)
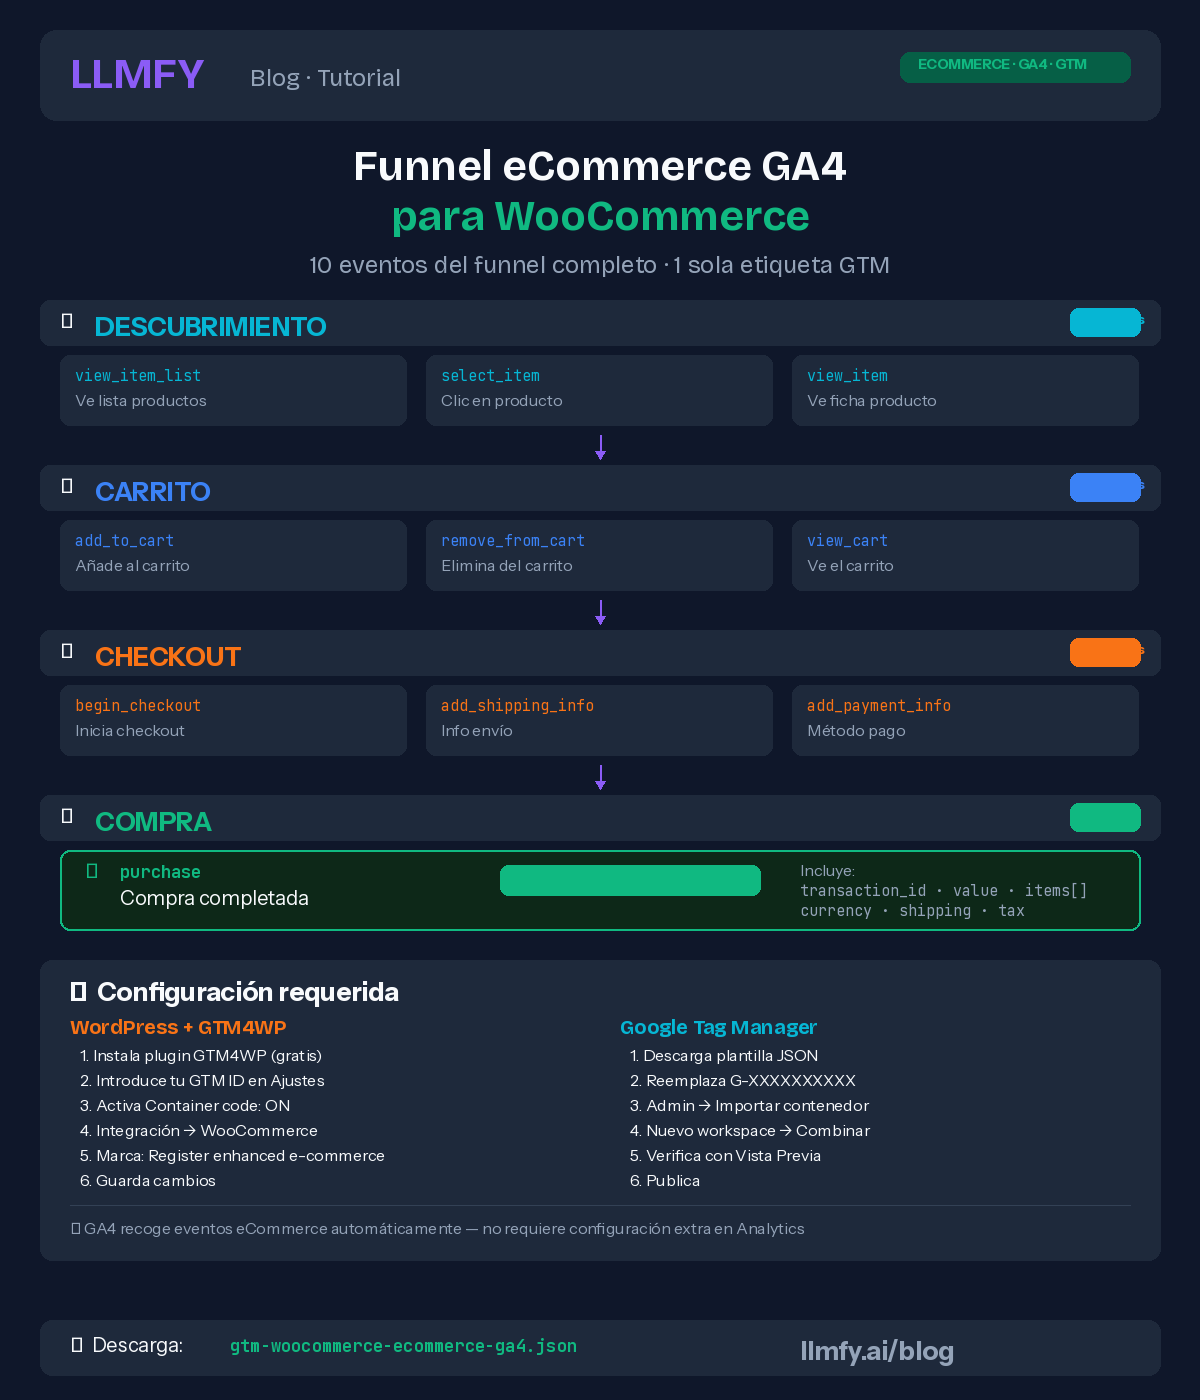
Step 2: Change your GA4 ID
Same as the services template: after importing, go to Variables → GA4 Measurement ID and change G-XXXXXXXXXX to your real ID. Just one place to update.
Step 3: Import into GTM
Same process as before: Admin → Import Container → New Workspace → Merge → Confirm.
Step 4: Verify with a test purchase
This is the most important verification in the entire guide. If you skip this step and there's an error, you can lose entire weeks of sales data.
- Enable GTM Preview mode
- Browse your store: visit a category, click a product, add to cart
- Verify these fire:
view_item_list,view_item,add_to_cart - Go to cart → verify
view_cart - Start checkout → verify
begin_checkout - Make a test purchase — Use Stripe/PayPal sandbox mode if available. If not, make a real €1 purchase and refund yourself. It's worth the effort.
- Verify
purchasefires with the correct value
You can also check in GA4 → Realtime to see events coming in live.
Step 5: Mark purchase as conversion in GA4
A heads-up that would've saved me a couple of support emails: events do NOT appear instantly in GA4. After publishing the GTM container and making your first test purchase, events can take 24 to 48 hours to show up in GA4 → Admin → Events. Don't get frustrated if you don't see them — this is completely normal.
To skip the wait, go to Admin → Key events → New key event and type purchase. GA4 will recognize it as soon as the first data arrives.
Once events are visible:
- Go to GA4 → Admin → Events
- Find
purchase - Toggle "Mark as key event"
Google recommends marking only high-value events: purchase is mandatory. Optionally mark begin_checkout and add_to_cart to measure the full funnel.
A note on GTM4WP
GTM4WP (created by Thomas Geiger) is the industry standard for connecting WooCommerce to GTM. It's free, well-maintained, and uses Google's recommended event names. I've been using it for years and it's never let me down. There's a Pro version for advanced features, but for most stores the free version is more than enough.
Sources: GTM4WP official documentation | Google Analytics 4 eCommerce events
Part 3: What if I have a store AND lead forms?
If you run a WooCommerce store that also generates leads (contact form, phone for custom quotes), you can import both templates without issues. GTM allows combining multiple imports as long as you choose "Rename conflicting items".
The order I recommend: import eCommerce first, then services. Both share the GA4 Measurement ID variable — GTM will auto-rename the duplicate. Verify both sets of tags fire correctly and you're good to go.
Part 4: Where your conversions come from (this is where it gets interesting)
Setting up conversions is only half the job. The other half — the part that actually gives you business intelligence — is knowing where those conversions come from.
With LLMFY AI Traffic Analytics you connect your GA4 property and see conversions broken down by channel:
- AI Traffic: how many conversions come from ChatGPT, Perplexity, Gemini, Claude, Copilot
- Traditional organic search: Google, Bing, DuckDuckGo
- Direct, Social, Referral, Paid
- Full eCommerce: revenue, purchases, average order value, conversion rate — all broken down by channel
This answers the question every one of my clients is asking in 2026: How much business is AI generating for me?
Here's a real example. With AI Traffic Analytics, one of our clients could see that ChatGPT sent them 88 sessions with 1 purchase worth €153, while Google organic sent 5,371 sessions with 42 purchases worth €3,929. And that AI traffic had a 73% engagement rate — well above other channels.
But these insights are only possible if you have conversions and eCommerce properly set up in GTM/GA4. Without that foundation, there's nothing to measure. It's like having a car without a speedometer.
The 5 mistakes I see over and over
After setting up GTM for many clients, there are errors that repeat with alarming frequency:
Mistake 1: Publishing without verifying. Always, always, always use GTM Preview before publishing. A production error can mean weeks of lost data. And there's no way to recover it.
Mistake 2: Having Google Analytics installed twice. If you already have GA4 via MonsterInsights, Site Kit, or directly in your theme code, disable it before using GTM. Otherwise you'll send duplicate pageviews and your data will be garbage. This happens more often than you'd think.
Mistake 3: Not marking events as conversions in GA4. Importing the GTM template sends events, but GA4 doesn't treat them as conversions automatically. It's a manual step that many people forget. Without it, events are there but don't get reported as conversions.
Mistake 4: Consent Mode not configured. If you're in the EU, you need a CMP integrated with GTM for GDPR compliance. The templates don't include CMP as each site uses a different one, but make sure you have one set up before going live.
Mistake 5: Not enabling eCommerce in GTM4WP. The WooCommerce template needs GTM4WP configured to push eCommerce data to the dataLayer. Without enabling "Track e-commerce" in the plugin, GTM tags won't fire because there are no events to capture. This is probably the most frustrating mistake because everything looks properly set up but it simply doesn't work.
Summary and template downloads
| Template | For whom | Events included |
|---|---|---|
| WordPress Services | Service websites, leads, professionals | generate_lead, phone_call, whatsapp_click, email_click |
| WooCommerce eCommerce | WooCommerce online stores | view_item, add_to_cart, purchase and 7 more events |
The quick version for the impatient:
- Download the JSON
- Import in GTM → New workspace → Merge
- In Variables, open "GA4 Measurement ID" and enter your real ID
- Verify with Preview
- Publish
- Mark events as conversions in GA4
Download files:
📥 Services WordPress Template (JSON) — Form, Phone, WhatsApp, Email
📥 eCommerce WooCommerce Template (JSON) — Full funnel 10 events
Sources and resources
- Google Tag Manager - Official documentation
- Google Analytics 4 - Recommended events
- GA4 eCommerce events reference
- GTM4WP - GA4 eCommerce documentation
- Google Consent Mode v2
- LLMFY AI Traffic Analytics
Article updated: February 2026. Templates tested with Google Tag Manager, GA4 and GTM4WP v1.20+.
Jesús LópezSEO
Founder & CEO @ LLMFY · 18+ years in SEO
SEO expert with over 18 years of experience. Pioneer in LLMO (Large Language Model Optimization) and founder of Posicionamiento Web Systems. Helping companies optimize their presence in traditional search engines and AI search engines.